Monday, September 3, 2012

Lots of updates!

Well it's been a while, but not for a lack of effort!

Mr. Fox!
Update #1 - Mr Fox is done! My workmate Aki is now the proud owner of this little beasty. You turn the crank on the side, and Mr. Fox lowers his newspaper. Once he's done that his eyebrows wiggle a little bit, and then he raises the newspaper once again. Very simple movement, but like all automata, a virtual Rube Goldberg design of parts. At least it feels like that sometimes..

Which brings me to...


There will be a Fishmonger on here eventually!

Update #2 - My 'Fishmonger' karakuri is advancing nicely.
Here's the latest image. The amount of parts to achive a simple racheted motion has got a little silly. However if they all work together, well why not? Makes things rather interesting to look at.
I have THREE ratchets in this automata. One on the crank arbor so that device is not cranked the wrong way. A second on that central hub close to the center of this picture, and a third linear ratchet for a carriage on top. I've still got to attach the 'paw' for this one.
Currently I have a small ratchet to design for the top wheel you see in the photo. I tried a curved piece of brass as the ratchet 'paw', but it was still too tight for that hub you see in the center to rotate freely when the carriage on top is pulled back by a spring or elastics. (Not attached just yet.) I have a tight space to work with, so that 'paw' arrangement will be difficult to make, but will look quite nice once it's done.
What's left to do is the ratchets, the springs, and then (I hope) some simple cam and wire lever arrangements for the yet-to-be-made fish monger and his fish.

Update #3 - I've had questions regarding the state of my Kyudo Doll, and I'm happy to say I will be working on him once again very soon. A co-worker Brian has recently purchased a 3D printer for his wify who is an Industrial Designer. In testing out the little beasty Brian was nice enough to print off a couple test parts using a couple of my cad creations. One of them is this:
This I am calling this my Kyudo bobbin, and in a sense that's what is is. It will hold my new small nylon pulleys that I purchased a month or so ago, represented here in yellow. This will be attached to the underside of the platform on the Kyudo Karakuri, carefully guiding the cords from the doll down the center of the device and 'aiming' them to a rack of more nylon pulleys at the side.

Photo of 3D print to follow!

Here's the current state of my poor archer-
Not for long!

These in turn will guide the cords to the cam levers on the side. I now plan to remake these levers out of UHMW plastic so that as they slide between those wooden disks, the friction is a low as I can get it!

That's all for now. I'll post photo's of Brian's 3D prints as soon as I have them!
(Big Thanks to Brian W!)

Oh one more photo. Here's all the springs and doodads I've got my hands on now; I'll be busy for quite a while me thinks...


Wednesday, June 13, 2012

Mr Fox takes shape

Here's the latest on my hopefully 'quick' project I'm calling 'Mr Fox'. The hard part is over, most of the mechanics are done. Next step is to make the fox puppet, and he'll be sitting in a fancy arm chair, smoking a pipe, reading a paper, looking like, well, a mischievous fox...

Thursday, May 31, 2012

Another side project

Here's yet another karakuri project I've started. Actually to be honest it's a couple months old, something I've been fiddling with every once in a while. It will be a 'fish merchant' karakuri that will have a figure cutting up a big fish. This photo shows my second attempt at making the mechanics for this one. Of course this started as a 'oh I can finish this one quickly' sort of thing, but like most of my projects it's turned into a bit of a monster...
I ran into a Makerfare contributor recently at a craft fare, and realized I'm not alone in having so many projects on the go. Still, must finish projects!
Back to the grind!

Thursday, May 24, 2012

Snailing Along...

So here's the latest.


I've completed the surface of the Mars globe and spent about 4 hours or so sketching out the 18th century version of the surface of the planet, canals and all. Tonight I finally had the time to start the process of painting the surface. As I mentioned in the last post I've got about 6 layers of gesso and than about 5 layers of pink tinted absorbent ground. This works nicely with water colour paint, and the only issue so far that I can tell is dealing with gravity. Painting watercolor on a curved surface does not lend itself to the usual charms of watercolour, so slow thin coats of paint layered up carefully does the job.
Here's a couple of photos of the sketch then the beginning of the painting...


Good news on the Archer Karakuri front, I have found some small plastic pulleys! That project can now get some long overdue attention. Time willing!


Thursday, May 3, 2012

Its been a while, but much to report...

So it's been a few months since I posted. Mostly this is due to work issues, I've been working 6 days a week to make ends meet. However I have been finding time to work on the various projects I've posted here.
I have been feeling a bit of shame because most of these grand ideas have not been completed for you to see the final result, so I have been returning to a couple projects to finish them once and for all.
Be for I go on, The Karakuri Archer project is on hold until I find some small strong plastic pulley wheels so I may minimize the friction while trying to turn the crank on the devise. So far no joy. But for now it will be looking down from the shelf above my workstation reminding me to get on with it.
I have returned to the Mars Orery project. Currently I've been working on hand making the beveled gears to drive the device. Whether or not they will be strong enough is another thing. I have thought to maybe send the cad specs off to one of many prototype companies and have some UHMW versions of these made because of the stress they'll be under. We'll see...


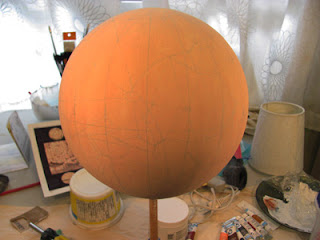
The other part of the Orery that will be complete soon is the globe of Mars. As you can see from this image I have been slowly adding layers of plaster over a foam ball. Sanding between layers the globe is slowly smoothing over nicely. Next is a few layers of gesso, and then a couple layer of absorbent bond. This will allow me to paint the surface with watercolor paint and avoid the 'plastic' look of acrylic paint. More on the antiquing of the globe as I progress.
That's all for now, more posting soon.