Thursday, May 24, 2012

Snailing Along...

So here's the latest.


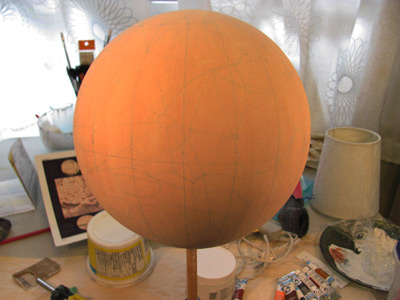
I've completed the surface of the Mars globe and spent about 4 hours or so sketching out the 18th century version of the surface of the planet, canals and all. Tonight I finally had the time to start the process of painting the surface. As I mentioned in the last post I've got about 6 layers of gesso and than about 5 layers of pink tinted absorbent ground. This works nicely with water colour paint, and the only issue so far that I can tell is dealing with gravity. Painting watercolor on a curved surface does not lend itself to the usual charms of watercolour, so slow thin coats of paint layered up carefully does the job.
Here's a couple of photos of the sketch then the beginning of the painting...


Good news on the Archer Karakuri front, I have found some small plastic pulleys! That project can now get some long overdue attention. Time willing!


Thursday, May 3, 2012

Its been a while, but much to report...

So it's been a few months since I posted. Mostly this is due to work issues, I've been working 6 days a week to make ends meet. However I have been finding time to work on the various projects I've posted here.
I have been feeling a bit of shame because most of these grand ideas have not been completed for you to see the final result, so I have been returning to a couple projects to finish them once and for all.
Be for I go on, The Karakuri Archer project is on hold until I find some small strong plastic pulley wheels so I may minimize the friction while trying to turn the crank on the devise. So far no joy. But for now it will be looking down from the shelf above my workstation reminding me to get on with it.
I have returned to the Mars Orery project. Currently I've been working on hand making the beveled gears to drive the device. Whether or not they will be strong enough is another thing. I have thought to maybe send the cad specs off to one of many prototype companies and have some UHMW versions of these made because of the stress they'll be under. We'll see...


The other part of the Orery that will be complete soon is the globe of Mars. As you can see from this image I have been slowly adding layers of plaster over a foam ball. Sanding between layers the globe is slowly smoothing over nicely. Next is a few layers of gesso, and then a couple layer of absorbent bond. This will allow me to paint the surface with watercolor paint and avoid the 'plastic' look of acrylic paint. More on the antiquing of the globe as I progress.
That's all for now, more posting soon.

Sunday, November 20, 2011

Cams with springs!

Here's the latest condition of the archer. I have managed to find some nice little expansion springs for cheap at CT of all places. As you can see I've attached them on the outside of the main body of the machine. They are working just fine. Next step is to wax up the parts and re-attach the strings from the figure. By next post I'll be able to claim success or not!
Fingers crossed!

Tuesday, November 15, 2011

The joys of an ipad2 and sketchbook pro

This is my first post from my new tablet!
Recently I've finally been able to purchase a ipad2, which I figured in the long run would enable to sketch out ideas while on the run. Since a lot of design these days seems to cross between various programs like photoshop/illustrator and various cad programs, it made sence to me to have a way to digitally sketch ideas out and easily import into whatever program I'd like to use to finalize ideas.
By far Sketchbook Pro is the best sketching app for the iPad. For more detailed measured design I've found iDesign, which enables you to make Illustrator like drawings using accurate and editable unit lengths, for eg. in inches or centimeters. These finalized drawing can be printed out to a wireless printer if you have access to one with little issues. So in other words you can travel, surf and research, come up with a sketch idea, finalize it and with luck print out your automata ideas from one little tablet. It's great!!
Here's an example of a quick one afternoon project I sketched out in 10 minutes.

Tomorrow I'm in the shop again, more work on the cam arrangement for the Kyudo archer. Inching forward!

Wednesday, November 2, 2011

Finally time in the dungeon!

It's been a couple months but I have finally found some time to work on the Kyudo Archer.
I have started to replace the drive train with a design spotted in a new video about Karakuri.
It involves using large disks to separate the cams, with the the levers that follow the cams placed under the cams, with some sort of reverse force applied. ( I think counter acting cams or weights. Not too sure just yet.)
Here's the current state:
It doesn't look much different from the original cam design I made, but these slight modifications will help the levers follow the cams much easier. I hope!
You can see here that the strings that follow the outside of the arms look a little untidy. This is a prototype, so in the next version, IF I can get this to work, I plan to hide the strings in carefully carved grooves in the arms. That's still a few months away.
In other news, my friends Carol and Russ brought back a small gift from their most recent auction trip to Japan to buy antiques for their business here in Vancouver. They were nice enough to visit a doll store and purchase a small sample of traditional doll heads. Thanks Russ and Carol @ Kikori Japanese Antiques!!!

More next week! Hopefully...

Wednesday, September 7, 2011

Oh those darn eyeballs!

So I am gearing up for a considerable re-design of the drive chain based on some recent vids posted on the net. However at home last night I was able to attempt to make my first eyeballs from scratch. 
This site http://www.nonidolls.com/eye.html had instructions on making 'glass' eyeballs from scratch. I had to make 4 mm eyes for my archer, so I gave it a go. It's a bit difficult, and only a few out of a few dozen seemed to work. BUT the downer came in the form of air bubbles that formed on the surface of my little eyes. I used my wife's clear nail polish, and I think there was a bit  of a chemical reaction between the Fimo and the polish. The glaze looked great going on, but overnight something messed. I have resorted to carefully painting on the pupils and re-coating the two chosen eyes once again. It works, but not as precise.
If you give these eye a go, beware, it'll probably take a few attempts to pull it off. 
Off to a full day in the dungeon/workshop!

Monday, September 5, 2011

Adding Hair - the not-so-perfect way.

Not much time this week for work on the archer doll, but I did manage to add some hair to the doll's head and fine tune a few of the joints.
Here's a photo- I've used the 'poor mans' method where I purchased a fake beard, took it apart carefully, and epoxied the hair down in strips. This is NOT the typical method for adding hair to the dolls in the traditional sense, but until I meet a master who would be generous enough to teach me properly, this way will work for now. I the end it didn't look too bad. Could have been a little tidier but overall the results are good. This is, after all, a prototype!
Next on the to-do list is re-make the supports for the drive train. It is currently slipping. I may have to come up with a better balanced system to move the arms up and down, which at the moment are proving to be the most difficult to move. Looking at the photos of the original older mechanisms, it appears that there are some counter-weights that might help matters. I should assume that some sort of gravity assisted mechanisms is involved. I really wished I had seen that original archer moving up close and personal! 
'might add some sideburns after I polish the face up a bit  more...