Monday, September 3, 2012

Lots of updates!

Well it's been a while, but not for a lack of effort!

Mr. Fox!
Update #1 - Mr Fox is done! My workmate Aki is now the proud owner of this little beasty. You turn the crank on the side, and Mr. Fox lowers his newspaper. Once he's done that his eyebrows wiggle a little bit, and then he raises the newspaper once again. Very simple movement, but like all automata, a virtual Rube Goldberg design of parts. At least it feels like that sometimes..

Which brings me to...


There will be a Fishmonger on here eventually!

Update #2 - My 'Fishmonger' karakuri is advancing nicely.
Here's the latest image. The amount of parts to achive a simple racheted motion has got a little silly. However if they all work together, well why not? Makes things rather interesting to look at.
I have THREE ratchets in this automata. One on the crank arbor so that device is not cranked the wrong way. A second on that central hub close to the center of this picture, and a third linear ratchet for a carriage on top. I've still got to attach the 'paw' for this one.
Currently I have a small ratchet to design for the top wheel you see in the photo. I tried a curved piece of brass as the ratchet 'paw', but it was still too tight for that hub you see in the center to rotate freely when the carriage on top is pulled back by a spring or elastics. (Not attached just yet.) I have a tight space to work with, so that 'paw' arrangement will be difficult to make, but will look quite nice once it's done.
What's left to do is the ratchets, the springs, and then (I hope) some simple cam and wire lever arrangements for the yet-to-be-made fish monger and his fish.

Update #3 - I've had questions regarding the state of my Kyudo Doll, and I'm happy to say I will be working on him once again very soon. A co-worker Brian has recently purchased a 3D printer for his wify who is an Industrial Designer. In testing out the little beasty Brian was nice enough to print off a couple test parts using a couple of my cad creations. One of them is this:
This I am calling this my Kyudo bobbin, and in a sense that's what is is. It will hold my new small nylon pulleys that I purchased a month or so ago, represented here in yellow. This will be attached to the underside of the platform on the Kyudo Karakuri, carefully guiding the cords from the doll down the center of the device and 'aiming' them to a rack of more nylon pulleys at the side.

Photo of 3D print to follow!

Here's the current state of my poor archer-
Not for long!

These in turn will guide the cords to the cam levers on the side. I now plan to remake these levers out of UHMW plastic so that as they slide between those wooden disks, the friction is a low as I can get it!

That's all for now. I'll post photo's of Brian's 3D prints as soon as I have them!
(Big Thanks to Brian W!)

Oh one more photo. Here's all the springs and doodads I've got my hands on now; I'll be busy for quite a while me thinks...


Wednesday, June 13, 2012

Mr Fox takes shape

Here's the latest on my hopefully 'quick' project I'm calling 'Mr Fox'. The hard part is over, most of the mechanics are done. Next step is to make the fox puppet, and he'll be sitting in a fancy arm chair, smoking a pipe, reading a paper, looking like, well, a mischievous fox...

Thursday, May 31, 2012

Another side project

Here's yet another karakuri project I've started. Actually to be honest it's a couple months old, something I've been fiddling with every once in a while. It will be a 'fish merchant' karakuri that will have a figure cutting up a big fish. This photo shows my second attempt at making the mechanics for this one. Of course this started as a 'oh I can finish this one quickly' sort of thing, but like most of my projects it's turned into a bit of a monster...
I ran into a Makerfare contributor recently at a craft fare, and realized I'm not alone in having so many projects on the go. Still, must finish projects!
Back to the grind!

Thursday, May 24, 2012

Snailing Along...

So here's the latest.


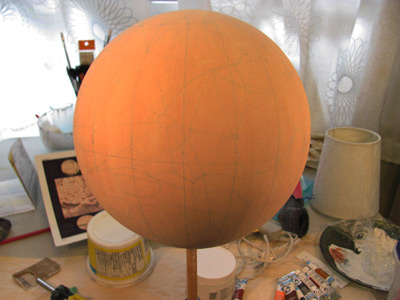
I've completed the surface of the Mars globe and spent about 4 hours or so sketching out the 18th century version of the surface of the planet, canals and all. Tonight I finally had the time to start the process of painting the surface. As I mentioned in the last post I've got about 6 layers of gesso and than about 5 layers of pink tinted absorbent ground. This works nicely with water colour paint, and the only issue so far that I can tell is dealing with gravity. Painting watercolor on a curved surface does not lend itself to the usual charms of watercolour, so slow thin coats of paint layered up carefully does the job.
Here's a couple of photos of the sketch then the beginning of the painting...


Good news on the Archer Karakuri front, I have found some small plastic pulleys! That project can now get some long overdue attention. Time willing!


Thursday, May 3, 2012

Its been a while, but much to report...

So it's been a few months since I posted. Mostly this is due to work issues, I've been working 6 days a week to make ends meet. However I have been finding time to work on the various projects I've posted here.
I have been feeling a bit of shame because most of these grand ideas have not been completed for you to see the final result, so I have been returning to a couple projects to finish them once and for all.
Be for I go on, The Karakuri Archer project is on hold until I find some small strong plastic pulley wheels so I may minimize the friction while trying to turn the crank on the devise. So far no joy. But for now it will be looking down from the shelf above my workstation reminding me to get on with it.
I have returned to the Mars Orery project. Currently I've been working on hand making the beveled gears to drive the device. Whether or not they will be strong enough is another thing. I have thought to maybe send the cad specs off to one of many prototype companies and have some UHMW versions of these made because of the stress they'll be under. We'll see...


The other part of the Orery that will be complete soon is the globe of Mars. As you can see from this image I have been slowly adding layers of plaster over a foam ball. Sanding between layers the globe is slowly smoothing over nicely. Next is a few layers of gesso, and then a couple layer of absorbent bond. This will allow me to paint the surface with watercolor paint and avoid the 'plastic' look of acrylic paint. More on the antiquing of the globe as I progress.
That's all for now, more posting soon.

Sunday, November 20, 2011

Cams with springs!

Here's the latest condition of the archer. I have managed to find some nice little expansion springs for cheap at CT of all places. As you can see I've attached them on the outside of the main body of the machine. They are working just fine. Next step is to wax up the parts and re-attach the strings from the figure. By next post I'll be able to claim success or not!
Fingers crossed!

Tuesday, November 15, 2011

The joys of an ipad2 and sketchbook pro

This is my first post from my new tablet!
Recently I've finally been able to purchase a ipad2, which I figured in the long run would enable to sketch out ideas while on the run. Since a lot of design these days seems to cross between various programs like photoshop/illustrator and various cad programs, it made sence to me to have a way to digitally sketch ideas out and easily import into whatever program I'd like to use to finalize ideas.
By far Sketchbook Pro is the best sketching app for the iPad. For more detailed measured design I've found iDesign, which enables you to make Illustrator like drawings using accurate and editable unit lengths, for eg. in inches or centimeters. These finalized drawing can be printed out to a wireless printer if you have access to one with little issues. So in other words you can travel, surf and research, come up with a sketch idea, finalize it and with luck print out your automata ideas from one little tablet. It's great!!
Here's an example of a quick one afternoon project I sketched out in 10 minutes.

Tomorrow I'm in the shop again, more work on the cam arrangement for the Kyudo archer. Inching forward!

Wednesday, November 2, 2011

Finally time in the dungeon!

It's been a couple months but I have finally found some time to work on the Kyudo Archer.
I have started to replace the drive train with a design spotted in a new video about Karakuri.
It involves using large disks to separate the cams, with the the levers that follow the cams placed under the cams, with some sort of reverse force applied. ( I think counter acting cams or weights. Not too sure just yet.)
Here's the current state:
It doesn't look much different from the original cam design I made, but these slight modifications will help the levers follow the cams much easier. I hope!
You can see here that the strings that follow the outside of the arms look a little untidy. This is a prototype, so in the next version, IF I can get this to work, I plan to hide the strings in carefully carved grooves in the arms. That's still a few months away.
In other news, my friends Carol and Russ brought back a small gift from their most recent auction trip to Japan to buy antiques for their business here in Vancouver. They were nice enough to visit a doll store and purchase a small sample of traditional doll heads. Thanks Russ and Carol @ Kikori Japanese Antiques!!!

More next week! Hopefully...

Wednesday, September 7, 2011

Oh those darn eyeballs!

So I am gearing up for a considerable re-design of the drive chain based on some recent vids posted on the net. However at home last night I was able to attempt to make my first eyeballs from scratch. 
This site http://www.nonidolls.com/eye.html had instructions on making 'glass' eyeballs from scratch. I had to make 4 mm eyes for my archer, so I gave it a go. It's a bit difficult, and only a few out of a few dozen seemed to work. BUT the downer came in the form of air bubbles that formed on the surface of my little eyes. I used my wife's clear nail polish, and I think there was a bit  of a chemical reaction between the Fimo and the polish. The glaze looked great going on, but overnight something messed. I have resorted to carefully painting on the pupils and re-coating the two chosen eyes once again. It works, but not as precise.
If you give these eye a go, beware, it'll probably take a few attempts to pull it off. 
Off to a full day in the dungeon/workshop!

Monday, September 5, 2011

Adding Hair - the not-so-perfect way.

Not much time this week for work on the archer doll, but I did manage to add some hair to the doll's head and fine tune a few of the joints.
Here's a photo- I've used the 'poor mans' method where I purchased a fake beard, took it apart carefully, and epoxied the hair down in strips. This is NOT the typical method for adding hair to the dolls in the traditional sense, but until I meet a master who would be generous enough to teach me properly, this way will work for now. I the end it didn't look too bad. Could have been a little tidier but overall the results are good. This is, after all, a prototype!
Next on the to-do list is re-make the supports for the drive train. It is currently slipping. I may have to come up with a better balanced system to move the arms up and down, which at the moment are proving to be the most difficult to move. Looking at the photos of the original older mechanisms, it appears that there are some counter-weights that might help matters. I should assume that some sort of gravity assisted mechanisms is involved. I really wished I had seen that original archer moving up close and personal! 
'might add some sideburns after I polish the face up a bit  more...


Sunday, August 28, 2011

Quick update

Thought I'd post a few photos related to my current attempts.

I was going though my Japan trip photos and came across a display at the Karakuri Museum in Nagoya. These show the process of designing and constructing an archer karakuri as done by the current master of karakuri, Shobei Tamaya IX,  The only disappointing thing to note is that I failed to get a clear photo of the center of the display that showed the cams in detail! Oh Man!


 And finally here is a shot of a classic example of Karakuri at it's height. This wonderful piece is in the Toyota Museum of Industry collection in Nagoya.


Thursday, August 11, 2011

Cams and Grommets...

Hi again!
I had a three or four hour stint in the little corner basement workshop this week. Nothing too dramatic was achieved, but I did manage to start to add the grommets for the strings to follow - you can see them here... You can see in this photo the 'stops' built into the arms so that when the bow arm is in tension, it should straighten out completely.
Also I added the third smaller gear to the 'drive' of the doll. This has slowed the potential action of the doll when it is cranked, just in case any quick motion might have damaged the mechanisms. This has allowed me to move the handle slightly up. Might save some knuckle skin in the long run.


Tonight I've started to break down the cycle of the movements and made a primitive drawing of the possible cam shapes. I have five cams designed into the base, four are now accounted for. One for the up and down motion of the shoulders, moving both the arms up. The next one straightens the bow arm, while the other arm cam bends the forearm of the string arm forward. The fourth cam should pull the upper part of the string arm in the opposite direction as the bow is drawn.


I'm thinking now, as I type this, that the fifth cam could be used to activate the trigger hand to release the bow string - but that might be a tougher done than said.
Here's my very rough drawing of the cam designs based on breaking the time down into 360 degrees. As I've said before, this Kyudo doll won't do every movement precisely, just mimic most of them. I found a video online of a gal putting on quite a performance, and basically decided to time the motions so that the up and down movements of the arms would be the point where the doll would 'cycle' to it's beginning stance. Unfortunately my skills are not up to snuff so much to include the relaxed pose of the archer at the end of the shot. You can see the video that inspired me here.
I'll have to wait another week before I can string this doll up -- sigh. 
Before I go, one more online treat is an old black and white film of Kyudo archers in full armor practicing their combat skills. This is quite amazing, and I think that armor design has given me a few ideas on how to decorate my archer.


Here's something to make your mind buzz for now...


Wednesday, August 3, 2011

The 'Archer' takes shape...

Here's the latest state (sort-of) of the Kyudo archer karakuri:
There's so much more to do with this project I don't know where to start...
It might look a bit elegant for now, but the most important parts, the strings and levers, are still to be figured out.
This is not the most recent state, but it's close. What I have done since this photo was taken was re-design the bow arm, re-design the chest area, and generally clean up the rough look of this doll. I've narrowed the waist a bit so that his shoulders appear wider, and the bow arm is designed now with 'stops' built into it. Basically the limits of motion have been re-designed into the arm. This will help to stop the arms from flopping in the wrong direction once under tension.

Next on the to-do list is: 
-add a third smaller gear to the geartrain and attach the crank/handle to this new gear. (This will slow the motion down by a factor of four, at least I hope so...

-I have some hair to attach - which I will do soon because it's always nice to see your figure 'come alive'. This tends to help focus on the detailing I find...

-space out the cam wheels with plastic bearings, and then take all but one out, and then string up my first range of motion The first basic 'range of motion' will be the up and down movement of the shoulders/arms. Here's an image from the web showing the motion flow of a Kyudo archer-
Essentially I want to emulate the steps from about the third figure in to the seventh figure, and cycle back to the third. I won't be able to raise the arms up as high as this figure shows, but it should be close.

- next I need to figure out how to string the doll's arms to get the leverage I will need to have realistic motion. This will be the most difficult part. I suspect I'll have to re-design a number of cams to make this work.

I have an idea how to go about designing the various motions, and I'll share that with you next time...
'Till the next day in the shop I'll be reviewing the finished idea over and over in my head. I does help!


Thursday, July 21, 2011

Inching forward...

Here's the latest progress. Not much to show, but it was a bit fiddly. I managed only three hours this week as I am recovering from some nasty dentistry yesterday. I have a mouth full of stitches, and with the pain killers the 'attention to detail' was lacking a bit. I managed to wreck one of my dozuki blades in a brief bout of frustration, so I had to stop after a few goals were achieved.
You can see here I have managed to fix the plastic geared wheels to wood circles so that I was able to pin the wheels through the arbors. Iv'e added a rough handle (and spacers to stop the gears un-meshing) and have also cut a rounded hole in the top with a Ume (plum) petal-like arrangement of eyelets to eventually accommodate the strings up to the doll. I've also very roughly shaped out the lower section of the doll which eventually will have realistic legs with Tabi socks, with the intent of making proper footwear for the archer. I plan for the doll to look more like a traditional Kyudo archer, not so much like the Samurai archer you saw in my last post - I think it would look more elegant me thinks...
Next, affixing the cam wheels to the main arbor and making tiny rollers and spacers out of Fimo. I might have my first crack at the head of the archer - though I think it will take a few tries to get that just right...


More hopefully next week.

Saturday, July 16, 2011

Coincidentally a new short film about Karakuri featuring...

Check out this new karakuri film on Vimeo. Amazingly enough it features an archer. Mine won't be as nice, but hey, humble beginnings...

Wednesday, July 13, 2011

Two weeks later...

I haven't had much time to work on my latest project lately due to an erratic work schedule and various meetings- BUT this week I managed to work on the Archer for a couple hours...


This is just a prototype construction, eventually everything will look a little more polished. On the right you can see the brass bearings that will rest on the cams, now represented as the wheels you see here. I plan to cut the wheels into cams as I work out the various movements in the yet to be made Archer doll. The green gears will next be fixed to the brass pinion using wood wheels screwed to the plastic, and then a pin passed through the pinion/new wheel. A handle is next as well. There will be a string 'shuttle' just under the hole drilled in the top to guide the strings up to the doll. I have to be very careful to make this as friction-less as possible, so I plan to use small brass grommets to help with this.


In the next view you can see a few elastics as stand-ins for the springs I have yet to find. Most of the time you'll see the cams a little higher than here as the width of these circles represent the maximum distance the strings will eventually follow.


So for next week (or the next), more of the same; a little more fine tuning, and then a mock-up of the archer.

Sunday, July 3, 2011

Kyudo beginnings...

Planetarium update: I'm still planning to make some kind of device to file the gears of my planetarium carefully. A few technical glitches remain, but I'm close to getting back to that project soon.
Recently I've been distracting myself with various small automata projects, creations I know I can finish. In doing so my confidence has gone up a bit, so I've decided to make my first self-designed Karakuri.


What we have here is the basis of a Japanese Kyudo archer. Yes I know it doesn't look like much just yet, but these wheels and levers will be the basis of the mechanisms that will drive various movements in an upright traditional Kyudo archer. The levers and wheels will eventually have little strings attached to them and with luck I may have the basis of karakuri movement down. 
Next for this project is to attach some springs for tension, add a platform on top of the mechanics and begin construction of the mannequin.
A little bit every week and my confidence increases to tackle the tea doll. First, a try at an archer!

Friday, June 17, 2011

Saturday, June 11, 2011

Wednesday, June 1, 2011

Pinocchio and Muppets. Interesting.

Here's our first look at the main Character from Guillermo Del Toro and The Jim Henson Company's upcoming Pinocchio movie. Nice work...